Please come on over to my new blog and follow me there -
http://thenon-craftycrafter.blogspot.com.au/

I'll be transferring information to there from this blog as I get time. Any new tutorials/info will be posted there!


Tuesday, 19 May 2009

Quick Tip #2

Missing selection handles

Sometimes, even though you are clicking on the edge of your object you just can’t get the selection handles to appear around your object. Many people will tell you to close DS and reopen it and they’ll reappear. Well, yes they will... but there’s an easier (and quicker) way.....

Press the ALT key! Just like you use the ALT key to make the handles disappear, it will also make them reappear.

I don’t know why they go missing occasionally, but at least now you know how to get them back!

Saturday, 9 May 2009

Quick tip #1

What cartridges can you cut with the Design Studio Trial version?

Depending on where you purchased your Cricut it may have come with different cartridges to what came with someone elses Cricut that they purchased elsewhere.

However, regardless of what cartridges came with YOUR cricut, there seems to be a "standard" cricut package and the carts that came with that package are the only ones that can be used with the DS trial version. They are:


Cricut Personal - George & Basic Shapes (that's one cart - not two).
Cricut Create - Don Juan
Cricut Expressions - Plantin Schoolbook AND Accent Essentials.

Updated info here: Cutting with the trial version

Quick tips

I thought I'd start a Design Studio Quick Tips series to get me back into posting on the blog. I'll focus on the questions that seem to come up most in the different forums I belong to.

Quick tip #1 will be posted SOON!

Narelle

Tuesday, 5 May 2009

Wow! Over 100,000 hits to my blog!

In honour of that achievement I thought I should stop being so lazy and post some more tutorials. Question is: WHAT DO YOU WANT TO KNOW???

If you have any burning questions that you'd like a tutorial on please leave me a comment and I'll do my best to help you out!

Thanks to all of you for reading my little blog so far!

Monday, 26 January 2009

Resetting the Cricut

Here's the info from Cricut.com on how to reset your Cricut:

TECH SUPPORT NOOK - Reset Process
If your machine freezes, experiences power problems, cutting issues, or anything out of the realm of normal Cricut behavior, this reset procedure is a good place to start the troubleshooting process. Nine times out of ten, this will resolve the issue:

- First, turn your machine on with no cartridge loaded. Then you are going to roll all your gray dials (the two on the left and the one on the right) down to their lowest setting.

- Then you will want to grasp the green/gold cylinder blade assembly and use it to pull the entire gray carriage car unit (the one with the Cricut bug on it) along its track to the other side of the machine. Back in the cave where the gray carriage car usually sits there is a red button. Press that button and hold it down for about three seconds. Let go and then move the gray carriage car back into place.

- This next step will sound a bit odd, but many times it can fix your little "bug". You're going to roll all your dials all the way up and all the way down three times--three times for each dial.

- Then you are going to hit the "Cut" button and turn the machine off. Let the machine sit for a few minutes (15-20), load a cartridge, turn it on, and try a practice cut.

If this does not solve your problem, give us a call toll free at 1-877-727-4288 7am to 6pm MST Mon-Fri (make sure you are by your machine) and someone here will walk you through some troubleshooting tips and determine if a replacement machine is needed.

Friday, 23 January 2009

Forgot to back up!

So I was sick of how my blogged looked and decided to pick a new template. Did I make a backup of the blog? No, of course I didn't. (What could possibly go wrong???)

So, I change the template, save and lo and behold - all my gadgets were gone. All the links to other sites and blogs. My page counter, my followers.... everything!

I've managed to get most of it back, but still need to add the sites/blogs. Some of them I have no idea of the addresses.

And to make matters worse - I still hate the look of the blog!

Monday, 19 January 2009

Vertical Welding

There are two ways to create vertical welding.

  • Placing all your letters/pictures all in one object box. Using this option allows you to move/resize etc the whole word at once.
  • Making each letter/picture its own object. Each letter must be moved/resized individually

Here is how you do it the first way:

  • Select a cartridge. This example uses the Base Camp cartridge.
  • Type the word you want to weld. I have used the word BASE


  • Using your mouse select the A. The outline will turn red.


  • Using the Nudge buttons in the Properties box move the A down and to the left until it is under the B.

    Make sure the top of the A is just slightly overlapping the bottom edge of the B.


  • Select the S and again using the Nudge buttons move it down and to the left so that it is under the A and the top is overlapping the bottom of the A.


  • Select the E and Nudge it down and to the left so it's under the S and its top is overlapping the bottom of the S


  • Tick Welding in the Properties box


  • At this point you can increase/decrease the size of your word by using the bottom right sizing handle.

  • To check that the word has welded correctly open a new page in your design by clicking the New Page button.


  • Click the Preview button.


  • You should see something like this:


And now to the second way of welding vertically.

  • Type the word BASE. After typing each letter press the Enter key. That way each letter will become its own object.
    Notice how there is an object box around each individual letter.


  • Select the B

  • Select Welding from the Properties box


  • Select the A. Using the Free move handle (top left) move the A underneath the B. Make sure it is slightly overlapping the bottom of the B

    (Hold down the ALT key to make the handles disappear. This makes placing your object much easier.)


  • Click Welding in the Properties box

  • Select the S and move it underneath the A. Check that it is overlapping the bottom of the A

  • Click Welding

  • Select the E and move it underneath the S. Check that it is overlapping the bottom of the S

  • Click Welding

  • Open a new page in your design to check the welding by clicking the New Page button


  • Click the Preview button


  • If any of the letters are a solid colour, it means that Welding has not been selected.

  • If you need to adjust the overlapping of any letters, go back to the page with the design on it and adjust as necessary.


Here is the word BASE done both ways. They look pretty much the same. The difference is that the first one is easier to resize/move.

Monday, 22 December 2008

Hide Contour feature

Here's a quick tutorial on using the new Hide Contour feature that was included in the December 08 update. Get the update here: DS Update Dec 08.

  • Place an object from one of the DS cartridges on your virtual mat.
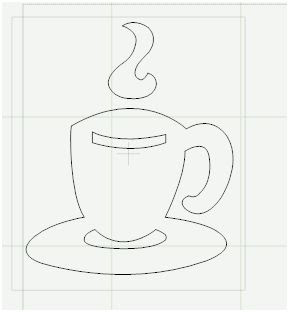
I've used the cup and saucer from the the Beyond Birthdays cartridge.


  • Left click on any edge of the object to select it.
The outline of the object will change from black to red.


In the example above we'll hide the steam.


  • Left click on the outline of the steam.
It will turn red. The rest of the image will turn black.


  • Right click anywhere near the object and select Hide Selected Contour from the drop down menu.

  • Press Enter or click elsewhere on the virtual mat.
The outline of the steam is now a light blue color and won't cut out when you send your design to the Cricut.


  • To make the steam appear again left click to select it.
  • Right click and select Show Selected Contour from the drop down menu


And now to the "bug" in this new feature.

If you hide a contour in an object, then use the copy & paste function to copy the object the "hidden" contour won't be hidden in the pasted objects. (The "hiding" doesn't copy over).

Also, the "hide selected contour" function won't be available to the pasted objects when you right click. Very annoying. But there is a way around it.

After you have copied and pasted your objects, save your file then close it.
When you re-open the file the Hide contour feature should now be available.

Sunday, 22 June 2008

Downloading .txt files from the Cricut Message Board

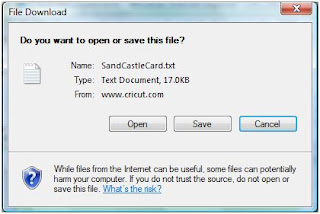
Many Design Studio .cut files are being posted on the Cricut Message Board as .txt files. Here's how you download them and save them into DS.

  • Click on the Attachment box at the bottom of the post

  • Click on the file name of the attachment


  • Click on the Save to Disk button (for Firefox users) or the Save button (for Internet Explorer users)

  • For Firefox users click the OK button when it becomes active (it may take a few seconds depending on the speed of your computer/internet)
  • Navigate to the folder you want to save the file to
  • After the file name type a .cut
  • Click on the "Save as Type" box. Change the type from Text Document to All Files.


  • Click Save
  • Click the Close Window option on the Message board download box


  • Open Design Studio, navigate to the correct folder and open the file.

Downloading .cut files from Mediafire

Follow these steps to download .cut files from Mediafire. The steps below are the same for Windows XP and Windows Vista.

  • Click on the link of the file you want to download. (You will find this in a message board post or blog you are reading). eg:
  • You should be taken to the Mediafire account of the person who owns the .cut file. (If not, just copy and paste the link into your browser)

  • Click on the "Click here to start download" box (circled above). This may take a few seconds to appear.
  • The box will change to this:


  • A new dialog box will open:

  • Click on the "Save to Disc" option (for Firefox users) or the Save button (for Internet Explorer users)

  • For Firefox users click the OK button when it becomes active (it may take up to 10 seconds) - be patient...

  • At the next box select the folder you wish to save the file to and select Save.

  • Open Design Studio, navigate to the folder you saved the file to and open it!

Thursday, 19 June 2008

Business Card Holder

Here's a little something I threw together today for a Cricut message board member. It's a business card holder that is 1" deep and just a little shorter than the height of a regular business card. I don't usually use staples to put my designs together, but I was in a bit of a hurry!


And here's the cut file:
http://www.mediafire.com/?cu1dm9mb3mz (US date version)
http://www.mediafire.com/?cuvdwxnaewy (Aus date version)

Monday, 16 June 2008

Welding 101

There are two ways to weld. They are:

METHOD 1:

All letters/pictures are typed into the one "object box". Here's an example:


Notice how there is one set of selection handles and one object box surrounding the entire word.  

PROS: It's quicker You only need to click Weld once You can reduce/enlarge and copy the whole tile at once The Nudge feature works

CONS: You can't rotate/skew/flip individual letters You can't change/delete or insert letters in between existing letters without backspacing from the last letter  


METHOD 2: Each letter/picture is created as its own "object". Here's an example:


Notice how each letter has a box around it. In the example above the last D has been selected and it's the only letter with the selection handles showing. Any changes you make will only happen to THAT letter.  

PROS: You can rotate/flip/skew/move/stretch individual letters You can weld multiple fonts/objects together  

CONS: You have to click Welding on EACH object. The Nudge feature doesn't work. You must use the selection handles or the arrow keys on your keyboard to move your object.  


Welding using Method 1 

 Select a font cartridge from the cartridge library and make it active. Using your computer keys (or using the mouse to select the keys on the virtual keypad) type the letters DAD onto the mat.


With the kerning figure set to 0.000 click the Apply button


The 3 letters will move closer together.


Click on any edge of the A. It will change to a dotted outline. Click the left Nudge button several times until the A slightly overlaps the first D. (You may want to change your view to 100% or 200% to better see the overlap.)


Select the second D and use the Nudge button to move it so it is also just overlapping the A. (In this case I moved it to the right. You can also use the up and down nudge buttons to move the A and the last D up or down.)


Making sure the word is still selected, tick the Welding box

Click the New Page button (Previewing from a new page clearly shows which lines your Cricut will cut.)


Click the Preview button


This should be your result:


If you're not happy with the result, return to the page with design on it and nudge your letters again. Make sure you return to the page with the design on it to cut with the Cricut.  


Welding using Method 2  

Select a font cartridge from the cartridge library and make it active. Type the letter D onto the mat. Press Enter on your keyboard


Type the letter A Press Enter


Type the letter D Press Enter


Each letter is a separate object (each letter has its own object box around it) and can be manipulated in any way, whilst not effecting any of the other letters. Let's make a change to the A. Select the A


Using the Proportional stretch button (bottom right handle) stretch the A to make it bigger.


Now we'll weld the letters together. Move the A over so it just overlaps the outer edge of the first D. (Don't move it over the inside edge of the D or the middle of the D won't cut out). Remember you can use your mouse to move the object by clicking on the Free Move handle (the top left handle) or by using the arrow keys on you keyboard. Use the CTRL key with the arrow keys to move the object in smaller increments.


Select the second D and move it over so it just overlaps the outer edge of the A.


Select the first D and check the Welding box Select the A and check the Welding box Select the second D and check the Welding box. Your preview should look something like this: