Please come on over to my new blog and follow me there -
http://thenon-craftycrafter.blogspot.com.au/

I'll be transferring information to there from this blog as I get time. Any new tutorials/info will be posted there!


Sunday 22 June 2008

Downloading .txt files from the Cricut Message Board

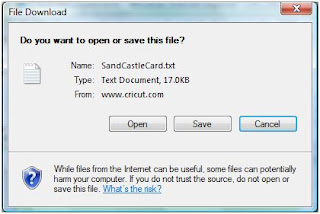
Many Design Studio .cut files are being posted on the Cricut Message Board as .txt files. Here's how you download them and save them into DS.

  • Click on the Attachment box at the bottom of the post

  • Click on the file name of the attachment


  • Click on the Save to Disk button (for Firefox users) or the Save button (for Internet Explorer users)

  • For Firefox users click the OK button when it becomes active (it may take a few seconds depending on the speed of your computer/internet)
  • Navigate to the folder you want to save the file to
  • After the file name type a .cut
  • Click on the "Save as Type" box. Change the type from Text Document to All Files.


  • Click Save
  • Click the Close Window option on the Message board download box


  • Open Design Studio, navigate to the correct folder and open the file.

Downloading .cut files from Mediafire

Follow these steps to download .cut files from Mediafire. The steps below are the same for Windows XP and Windows Vista.

  • Click on the link of the file you want to download. (You will find this in a message board post or blog you are reading). eg:
  • You should be taken to the Mediafire account of the person who owns the .cut file. (If not, just copy and paste the link into your browser)

  • Click on the "Click here to start download" box (circled above). This may take a few seconds to appear.
  • The box will change to this:


  • A new dialog box will open:

  • Click on the "Save to Disc" option (for Firefox users) or the Save button (for Internet Explorer users)

  • For Firefox users click the OK button when it becomes active (it may take up to 10 seconds) - be patient...

  • At the next box select the folder you wish to save the file to and select Save.

  • Open Design Studio, navigate to the folder you saved the file to and open it!

Thursday 19 June 2008

Business Card Holder

Here's a little something I threw together today for a Cricut message board member. It's a business card holder that is 1" deep and just a little shorter than the height of a regular business card. I don't usually use staples to put my designs together, but I was in a bit of a hurry!


And here's the cut file:
http://www.mediafire.com/?cu1dm9mb3mz (US date version)
http://www.mediafire.com/?cuvdwxnaewy (Aus date version)

Monday 16 June 2008

Welding 101

There are two ways to weld. They are:

METHOD 1:

All letters/pictures are typed into the one "object box". Here's an example:


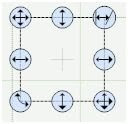
Notice how there is one set of selection handles and one object box surrounding the entire word.  

PROS: It's quicker You only need to click Weld once You can reduce/enlarge and copy the whole tile at once The Nudge feature works

CONS: You can't rotate/skew/flip individual letters You can't change/delete or insert letters in between existing letters without backspacing from the last letter  


METHOD 2: Each letter/picture is created as its own "object". Here's an example:


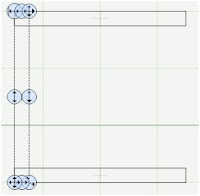
Notice how each letter has a box around it. In the example above the last D has been selected and it's the only letter with the selection handles showing. Any changes you make will only happen to THAT letter.  

PROS: You can rotate/flip/skew/move/stretch individual letters You can weld multiple fonts/objects together  

CONS: You have to click Welding on EACH object. The Nudge feature doesn't work. You must use the selection handles or the arrow keys on your keyboard to move your object.  


Welding using Method 1 

 Select a font cartridge from the cartridge library and make it active. Using your computer keys (or using the mouse to select the keys on the virtual keypad) type the letters DAD onto the mat.


With the kerning figure set to 0.000 click the Apply button


The 3 letters will move closer together.


Click on any edge of the A. It will change to a dotted outline. Click the left Nudge button several times until the A slightly overlaps the first D. (You may want to change your view to 100% or 200% to better see the overlap.)


Select the second D and use the Nudge button to move it so it is also just overlapping the A. (In this case I moved it to the right. You can also use the up and down nudge buttons to move the A and the last D up or down.)


Making sure the word is still selected, tick the Welding box

Click the New Page button (Previewing from a new page clearly shows which lines your Cricut will cut.)


Click the Preview button


This should be your result:


If you're not happy with the result, return to the page with design on it and nudge your letters again. Make sure you return to the page with the design on it to cut with the Cricut.  


Welding using Method 2  

Select a font cartridge from the cartridge library and make it active. Type the letter D onto the mat. Press Enter on your keyboard


Type the letter A Press Enter


Type the letter D Press Enter


Each letter is a separate object (each letter has its own object box around it) and can be manipulated in any way, whilst not effecting any of the other letters. Let's make a change to the A. Select the A


Using the Proportional stretch button (bottom right handle) stretch the A to make it bigger.


Now we'll weld the letters together. Move the A over so it just overlaps the outer edge of the first D. (Don't move it over the inside edge of the D or the middle of the D won't cut out). Remember you can use your mouse to move the object by clicking on the Free Move handle (the top left handle) or by using the arrow keys on you keyboard. Use the CTRL key with the arrow keys to move the object in smaller increments.


Select the second D and move it over so it just overlaps the outer edge of the A.


Select the first D and check the Welding box Select the A and check the Welding box Select the second D and check the Welding box. Your preview should look something like this:

Tuesday 3 June 2008

The Dreaded Red X

Have you ever spent ages creating a design in Design Studio and suddenly had this come up on your screen?

Closely followed by this?

I call it the Dreaded Red X.

So, what did you do to make that happen, and how can you fix it?

Why did it happen?

This commonly happens when you are stretching a rectangle from the George cartridge and you are viewing the page at 100%.

There appears to be a bug in the software that causes this.

How can you fix this without losing all your work?

Here's what I do:

  • Click the Continue button. The message box will go away and you will see a blank screen with just the Red X.
  • Select File, Save (or Save As and give it a name if you haven't saved the file previously).
  • Once the file has saved select File, Close
  • Select File, Open and open your file. Your work should reappear up to the point just before you got the error.
  • Change your view to Fit View and delete the offending rectangle.
  • Save your work again and continue.

How do I stop this happening?

The trick to avoiding this problem has been to not use the George rectangle and use the square shape instead. This has worked for me.... until today!

Today I was creating a 12" layout that included LOTS of frames. I made the frames using the square from George, stretched one of the squares out to the 12"mark and then WHAM.... the Dreaded Red X!

Luckily I was able to rescue my hard work using the method above. Unfortunately, every time I tried to create a long rectangle, I would get the same error. The only way around the problem was to use a number of smaller rectangles and weld them together into one long one. Tedious, but it worked.

Hopefully Provocraft will one day come out with an update to Design Studio that fixes this problem (along with a huge list of other improvements we are all hanging out for).

Monday 2 June 2008

Designing with multiple cartridges

Things you need to know to cut designs using multiple cartridges:
  • You need to have all the cartridges used in the design
  • If you're not using a Jukebox, you need to have a cartridge in the machine before you press CUT. Press Cancel at the "Cricut Jukebox Check" dialogue box then load each cartridge when prompted.
  • You must NOT turn your Cricut off when swapping cartridges
  • If you're using a Jukebox, make sure all the carts you have used are loaded then press the OK button

The frame below uses the following cartridges: George, Accent Essentials and Base Camp.


First, we’ll create a basic 3” square frame using the square shape from the George cartridge

  • Double click the George cartridge from the Cartridge Library. The George keypad should now be visible.

  • Click the Shift Lock key on the Design Studio keypad and click on the square shape. This will insert a square onto your mat.


(Note: We use the square shape because the rectangle shape causes the program to report an error. See info on “The dreaded red X”).
  • Use the Width property to stretch it to 3”.
  • Using the Horizontal Height handle shrink the height of the box to around .250”


The height of my rectangles ended up as .267”. Any height around that measurement is fine. (You can’t change the height or width of an object to less than 1” using the Properties box. This is why we need to use the Horizontal height handle).

  • While the rectangle is selected, click the Welding box.
  • Change the X axis property to 1.5 and the Y axis property to 1. This will make it easier to place the hearts around the box.

Now, we’ll copy that box to make the rest of the frame.

  • Make sure the shape is selected and Click the Copy button (or select Edit, Copy / CTRL +C). This copies the selected shape to the clipboard.
  • Click the Paste button (or select Edit, Paste / CTRL +V). This places a copy of the shape directly on top of the original shape.
  • Using the down arrow on you keyboard move this shape so that the bottom edge is aligned with the 4” grid line on the mat.

  • Select paste again. Another rectangle will be pasted on top of the first rectangle.
  • Select this rectangle and click the Turn 90 button.

  • Change the X axis to 1.5 and the Y axis to 4.0. This will move the shape to form the left edge of the frame.
  • While this rectangle is selected click the Copy button to copy it to the clipboard.
  • Click the Paste button
  • Select the new rectangle and move it over to 4.25” using the X axis property box.
You now have your completed frame. Because we clicked the Welding box after we created our first rectangle, the other three rectangles should also have Welding ticked as part of the copying process.

Now we’ll add the hearts to the outside edges.
  • Still using the George cartridge, make sure the Default size is set to 1”
  • Click the Heart key.


A heart will be placed on your mat.


  • Select that heart and click Welding
  • While the heart is still selected change the Rotate figure to -45

Now the heart should look like this:


  • Using the Free Move handle, move the heart over the top left hand corner of the frame, until the top point of the heart is touching the corner of the frame.
  • While the heart is still selected, click the Copy button.
  • Click the Paste button.
A new Welded heart will be pasted on top of the first heart.
  • While it is selected change the Rotate box to 45
Here's what you should see:


  • Using your keyboards right arrow key, move the heart over to the right. When you get close to where it should be hold down the Ctrl key and as you move the heart it will move in smaller increments allowing you to better place the object. (If you have placed your objects on the mat in the same place I have, the X axis will be 4.2)

  • Click the Paste button again. Another heart will be placed on top of the first heart.
  • Change the Rotate amount to -135.

  • Using the down arrow, move the new heart down to the bottom left hand corner of the frame.

  • Click the Copy button
  • Click the Paste button
  • Change the Rotate figure on the new heart to 135
  • Using the right arrow key, move the heart over to the bottom right corner of the frame.
Now all four corners will have a welded heart.

  • Click the heart key again and insert another heart onto the mat.
  • Move that heart to the top of the frame, so that the top of the heart is aligned with the highest point of the two corner hearts and the middle of the heart is aligned with the vertical grid line.
  • Click Welding.
  • Copy and paste that heart.
  • Click the Turn 90 button
  • Select the heart and move it to the left side of the frame.
To make it easier to line the hearts up correctly I moved the new heart over the top of the corner heart until one half of the new heart covered half of the bottom heart - like this:


  • Continue to move it down until it is centred along the left edge of the frame.


Don’t forget you can use the ALT key to make the handles disappear while you are moving the object and use the CTRL key to move the object in smaller increments.

  • Click Paste. Another heart will be placed on the mat.
  • Click the Turn 90 button until the heart is upside down.
  • Move the heart to the bottom edge of the frame. (Use the tip above to help align the hearts)

  • Paste the final heart onto the mat.
  • Click the Turn 90 button until it faces the right edge of the frame
  • Move it across and down until it aligned with the top right heart, then move it down until it is centred.
Now all the hearts have been positioned.


Now we’ll insert the text into the frame.
  • Select the Base Camp cartridge from the Cartridge library.
  • Press the Shift Lock key then the "I" key

  • Move the “I” inside the frame so it is just overlapping the bottom of the top, middle heart.

  • Click Welding
  • Use the Scale Stretch Handle to make the “I” a little smaller. (Don’t worry too much about the size yet as we will adjust it more after we have inserted the Heart and the “U”)
  • Insert a “U” on to the page and move it so that the bottom just overlaps the tip of the bottom middle heart.

  • Again, adjust the size
  • Click Welding
  • Select the Accent Essentials cartridge.
  • Click the Heart shape to place a heart on your mat

  • Place the heart between the “I” and the “U”.
  • Adjust the size if necessary and use the Rotate handle to turn it slightly. Make sure that part of the heart slightly overlaps both the “I” and the “U”.
  • When you are satisfied with its size and placement click Welding.
That’s the design completed.

It’s always a good idea to preview the design to make sure everything has welded. The best way to preview your design is from a new page.

Click the New Page button

Click the Preview button

You’ll might see something like this:


Some parts of the design aren’t showing and the inside of the frame is missing. This means we need to “burp” the frame. To do this:
  • Click back on the tab of the page that has the design on it
  • Select the right hand side of the frame
  • Select Edit, Cut (or Ctrl X or use the Delete button)

  • Undelete the shape by pressing Edit, Undo (or Ctrl Z)
  • Click on the tab for the Preview page again.
Now when you preview your design should look like this:


If the design still doesn’t look right in preview, continue to delete then undelete different parts of the frame until the burping is successful.

If there are any parts of the design that are coloured as opposed to showing the outline, it means they haven’t had the Welding box ticked. Select the shape and tick Welding.

Good luck!