Please come on over to my new blog and follow me there -
http://thenon-craftycrafter.blogspot.com.au/

I'll be transferring information to there from this blog as I get time. Any new tutorials/info will be posted there!


Saturday, 12 June 2010

Changing your Windows screen settings

If you are having trouble viewing the entire Design Studio screen you may need to change your screen settings.

Design Studio works best with a DPI (Dots per inch) setting of 96 (small) and a screen resolution of 1024 x 768 or larger.

Here's how you go about changing those settings....

If after you have changed these setting you find that the text on your screen is too small see the easy instructions at the end of this tutorial on how to enlarge the text.


Windows 7 (Windows Vista & XP instructions follow)

DPI -


Save and close any files you have open on your computer, as you will need to log off after you have made your DPI changes. Anything you haven't saved may be lost. 
  • Right click on your desktop and select Screen Resolution


  • Left click on "Make text and other items bigger or smaller"


  • Click the "Smaller (100%) default" button

  • Click the Apply button
You will then see this message box -


  • Click the "Log off now" button
After Windows closes any background programs and logs you off you will need to log back in.

---------------------------------------------------------------------------------
SCREEN RESOLUTION
  • Right click on your desktop and again select Screen Resolution 

Design Studio requires a screen resolution no smaller than 1024 x 768. The bigger your monitor the higher you can set your screen resolution. The higher your screen resolution, the clearer the images and text will appear on your monitor, although they will be smaller. I have a 17" monitor and use a screen resolution of 1600 x 900 and that is what Windows 7 recommends for my screen (which is indicated beside the setting.)

Again, if you find your text too hard to see at the new resolution you can enlarge it. See end of tutorial.


You should see "recommended" beside the resolution setting that Windows 7 recommends for your size screen. If you want to change that setting, here's what you need to do:
  • Click on the down arrow in the Resolution box. You will see a drop down box.


  • Move the slider down (or up) to the resolution you want 

  • Press Apply
  • To keep the selected resolution click the "Keep changes" button

  • If you want to change the resolution again, click the Revert button and change your setting again
  • Press OK
Changing the screen resolution does not require you to restart or log off. 

----------------------------------------------------------------------------------------------------

Now that you have changed your DPI & Screen Resolution so that DS will display correctly, you may find that some text is hard to read,  e.g. websites, Word, Excel...

You don't have to go back and change your screen settings, just enlarge the text on the screen:

Hold down the Ctrl key and press the + key. (Go on, do it now..... )    :)
The text just got bigger didn't it? Now do the Ctrl + again. It's bigger again, right?

You can keep enlarging the text till you're happy with the size.

To reduce the size of the text use Ctrl and the - key.

If you have a mouse with a wheel on top you can move that back and forth while holding down the Ctrl key to do the same thing.

This is also handy if you're having trouble seeing small photos on the message board.

It doesn't work in all programs, e.g. it doesn't work in Design Studio.

--------------------------------------------------------------------------------------------------

Here's how you change the screen resolution on Windows XP:

  • Right click on your desktop and select Properties
  • In the Display Properties dialog box click the Settings tab
  • Drag the screen resolution slider so that it shows 1024 x 768 pixels
  • Click Apply
  • Click Yes if asked if you like the new resolution
  • Click OK

To change the DPI:
  • Again right click on your Desktop and select Properties
  • Click the Settings tab
  • Click the Advanced button
  • Select Normal Size (96 DPI) from the drop down DPI setting box.
  • Click OK

You may need to retart your computer for this change to be applied.
Monday, 24 May 2010

Blog Update

Yes, I HAVE changed the design of the blog AGAIN! :)

But this time, I'm actually happy with it.

I've got some tutorials in mind, so I better get busy.

Saturday, 15 May 2010

Installing DS on your new computer

So, you've bought a new computer and you want to install your copy of Design Studio on to it? Or you reformatted your computer and need to reinstall DS?

Here's what you need to do:
  • DON'T install DS from the original cd. It is the original version from 2007 and isn't compatible with Windows Vista 64 bit or Windows 7 and chances are your new computer is running one of those. 
It also doesn't contain any of the new program updates and you'd need to update it anyway. But don't throw it away as you need the serial number from the cd envelope!
  • Disable your computer's Firewall and virus software
  • Download the program update from here.
For more information regarding downloading Design Studio updates see this post: Downloading and installing DS updates
  • After you have downloaded the Program update you need to install it.
  • Once DS has installed it will take you to the activation screen.
Some DS users have been able to use the serial number from the original DS disk to activate.

However, if after using that serial number you get an error message saying that your serial number has been installed on another computer you will need to contact Provocraft customer service.  They will release the number from your other computer so you can use it on your new computer.
You may need proof of purchase.

Contact details for Provocraft are:

Cricut Support hours
Monday - Friday 7:00am - 6:00pm (MST)
Phone: 801-932-1144
Toll free: (in the US) 877-7CRICUT

If you reside in Australia and purchased your copy of Design Studio from an Australian authorised Cricut retailer you can contact our local distributor (details below) who will issue you with your new number. You will DEFINITELY need your proof of purchase, so hang on to your receipt/tax invoice.

Australian distributor details:

Print Blocks - Brisbane
Send an email to cricut.service@printblocks.com.au (let them know you need a new serial number)

You will need to supply them with the following information:

Your name
Your address
Your phone number
Where purchased (Authorised Australian Cricut retailer)
Date purchased
Serial number of the Design Studio cd.

Attach a scanned copy of your original tax invoice to the email.

If your copy of DS didn't come from an Australian authorised Cricut retailer you will need to phone the US number above.

Thursday, 13 May 2010

Create A Critter shaped cards

Creating a shaped card is easy. Here's one using the Create-A-Critter cartridge. I can't wait till mine arrives so I can actually cut it out!

Copy = Ctrl C or Edit, Copy or the DS copy button
Paste = Ctrl V or Edit, Paste or the DS paste button

Decide what size you want your card to be and set that size on the Default Size slider under the DS keypad.


Place your image on the mat


With the image still selected copy it to the clipboard


Paste the copied image onto the mat. It will cover the original image.


Using the right arrow on your keypad (or the horizontal move handle - middle left) move the pasted image over to the right.


Select the image on the left, then select Flip from the Properties box


Move the left image over to the right so that the two images are just overlapping. Make sure you overlap them enough that the join won't be too flimsy when the card is folded.


Select each object in turn and click Welding in the Properties box.

Here's what the welded card look like when previewed from a new page.

Note that the feature lines in the tail are missing. That happens when objects are welded together.

Now that you have the base of your card, you can create the layers.

Create-A-Critter has 3 layers. Here's what my mat looks like with all the layers added ready to cut. The layers are in colour because they haven't had Welding selected, which means that the feature lines will cut.

Now all I need is for the cartridge to arrive! :)


Have a great day!


Monday, 10 May 2010

Uploading a picture as an avatar

Do you have a picture on your computer that you want to use as your avatar on the Cricut.com message board?

Here's how you do it using Photobucket. (www.photobucket.com):

(Thank you to Scrapalette for the easy directions)

1.    Open your photobucket account
2.    Click on the My Home link at the top of the screen


3.    Select the album to where you want to upload the photo


4.    Click the "more options" link
5.    Select Medium (320 x 240) * (see note below)


* Note: If the picture you are uploading is a very high resolution image, MEDIUM may still be too big. You may need to use either SMALL or TINY. (I had to use Tiny....) Come back to here if you get an error saying the file is too big at point no. 22.

6.    Click Save

7.    Click the green Upload Images and Videos button

8.    Navigate to the directory that contains the photo you want to upload

9.    Select the photo and press Open

10.  When the photo has finished uploading press the blue Save button

Underneath your photo you will see this box:


11.  Click inside the box next to Direct Link. The text should be hi-lighted.

12.  Use Ctrl C to copy the text to the clipboard (or right click and select Copy)

13.  Go to the cricut.com message board

14.  From the menu select My Profile

15.  Scroll down till you see this:

16.  Make sure "Upload my picture" is selected

17.  Click on Upload my picture (will replace the existing one)


18.  Click inside the file name box (or click the Browse button)


19.  Click inside the File Name box at the bottom of the screen


20.  Use Ctrl V (or right click, select Paste) to paste the image details.


21.  Press the Open button


22. Press OK. (If you get a "File too large" error, go back to point # 5 above.)


23.  Press OK.

Now you should see this:


Note: If you want to use the same photo as your Profile photo just click the 'Use your avatar as profile photo"


24.  Go to the bottom of the screen and press the Apply button.

Now go check one of your posts and you should see your new avatar!!

Friday, 30 April 2010

Downloading and installing DS updates


Frequently asked questions about adding cartridges to Design Studio

Q: I have cartridges missing from DS – how do I add them?

A: You need to update the PROGRAM and/or the CARTRIDGE CONTENT. See the tutorial below.

Q: I have repeatedly updated the firmware on my Cricut, but I still don't have all the cartridges.

A: Firmware just helps your Cricut talk to your computer. You need to update the Design Studio SOFTWARE to get new carts and updates to the program. (See below)

Q: I downloaded the Cartridge Content from the update link but I still don't have all my cartridges.

A: The CARTRIDGE CONTENT download contains only the most recently released cartridges. Look at the details at the download page. It tells you which carts are included in the font pack download. All other carts are bundled in the PROGRAM UPDATE.

Q: I selected Help, Check for Updates in DS and it says my DS is up to date. But I'm still missing cartridges!

A: For some reason, the Check for Update function has never worked. You need to go to http://www.cricut.com/CDS/Update.aspx to download the update.

Installing Design Studio updates - Start to finish

First some housekeeping:
  1. Make sure Design Studio is CLOSED when you are installing the updates.
  2. If your computer has multiple login id's make sure you are logged in as the administrator.
  3. Uninstall DS before updating. (There have been enough m/b members having problems with DS after installing updates to convince me that uninstalling IS a good idea.) Your serial number won't be removed if you do uninstall, so you don't have to worry about getting a new one. And your existing files won't be deleted. (But you are backing up your computer files regularly anyway aren't you….. aren't you?) To uninstall DS select Start, Control Panel, Programs, then select Cricut Design Studio and select Uninstall/Change.
  4. After you have uninstalled DS you should navigate to your c:/mydocuments/cricut/userdata folder and delete this file: CricutFontsMetadata.xml. Deleting this file usually fixes the problem of cartridges being in the wrong order. A new file will be created when you next open DS. Be aware - deleting this file removes any cartridges you have saved to your "My cartridges" and "Favorites" libraries. You will need to add them again after you have updated. 
  5. You should disable your firewall and virus software as they can block or interfere with the download. Once you have downloaded the updates and DS is running correctly, you can then turn them back on. Refer to the documentation that came with your virus software/firewall on how to disable it.
  6. To avoid unnecessary errors you should SAVE the installation file to your computer, and then run it from there. Running the installation file directly from the download link (especially the Font Pack) can cause corruption or errors during installation.

If you use the Firefox web browser http://www.mozilla-europe.org/en/firefox/ you can specify where you want the download to automatically be saved.

  • In Firefox select Tools, Options then select the General tab. (See pic below)
  • Click on the 'Save files to' button, and then click the Browse button. Select the directory to where you want downloads to automatically be saved. I always use the Downloads folder, but you might prefer just to save it to your desktop. Anywhere is fine! So long as you can find it later….
  • To make it easier to find the downloaded file, make sure you tick "Show the Downloads window when downloading a file"


Alternatively you could select the 'Always ask me where to save files' button. Then, each time you download something from the internet you will be asked where to save the file.


By default Internet Explorer asks you whether you want to Save or Run the install file.


Let's get started.

First you'll download and install the PROGRAM UPDATE. If you have done this recently (since November 2009) and you just want the latest released carts you can ignore these steps and go directly to the FONT PACK update info at the end of this tutorial.


Updating the PROGRAM

Go to http://www.cricut.com/CDS/Update.aspx

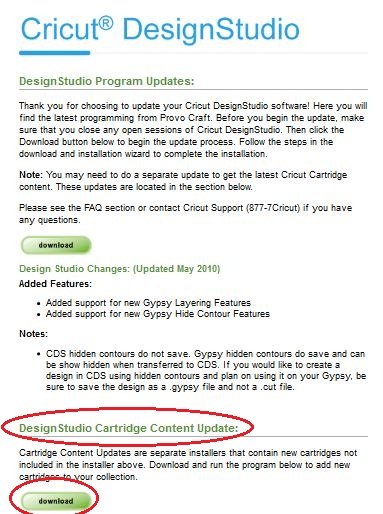
You will be presented with this page:


  • Click on the first Download button.
Here's what you should see:

Firefox
Internet Explorer
  • Click the Save File button (it may take a few seconds for the button to become active)

You should see this box:


When the download is complete you will see this box:

  • Double click the Setup.exe file to start the installation.
  • Click the Save button
You'll be prompted for a save location:

  • Navigate to the folder you want to save DS to then press the Open button.
If there is already a copy of setup.exe in that folder you may see this message:


  • Select Yes

You should see this box:


Make sure there is no tick beside "Close this dialog box when download completes"
  • When the download is complete press the Run button.

  • If you get a security warning that says "Do you want to allow the following program from an unknown publisher to make changes to this computer?" click YES.
You'll then see the Cricut Design Studio Setup Wizard box.


  • Click the Next button to install Design Studio

  • Click the I Agree button

Now you need to choose where you want to install Design Studio. 


The default location (C:\Program Files\Cricut Software\Cricut DesignStudio) should appear in the Destination Folder box.


  • To accept the default location press the Install button
When the update has been installed you will see this box:


  • Click the Finish button
Design Studio has now been updated.

----------------------------------------------------------------------------
 
The next step is to download and install the Cartridge Content.

This time click the second Download button.


Firefox
Internet Explorer

  • Click the Save File button

You will see the download box:

  • When the download is complete, double click the FontUpdate download.


  • Click the Save button

  • Navigate to where you want to save the fonts file then click the Save button
The fonts file will start to download.


  • When the download is complete click the Run button
  • If you get a security warning that says "Do you want to allow the following program from an unknown publisher to make changes to this computer?" click YES.
You will then see the Cricut Design Studio Font Installer box.


  • Click the Install Fonts (As Administrator) box
This only takes a few seconds. When it's complete you'll see this box:


  • Press the OK button
You might want to restart your computer at this stage.


When you next open Design Studio all the new carts will appear.


Monday, 26 April 2010

List of retired cartridges

Here's the up to date list of the carts that are being/have been retired and the date of announcement.

Many of the Creative Memories carts have been retired but I don't have those details.


List current at December 2011 (when PC stopped announcing which carts were being retired.)

50 States - March 2011
A Child's Year - November 2011
All Mixed Up - May 2010
Animal Kingdom - February 2011
Baseball - July 2010
Basecamp - November 2010
Basketball - July 2010
Batman - The Brave and the Bold - December 2011
Beyond Birthdays - October 2010
Billionaire - October 2011
Blackletter Solutions - February 2010
Block Party - October 2011
Camp Out - February 2011
Car Decals - April 2011
Cars - June 2011
Celebrations - January 2011
Chore Chart - October 2011
Christmas (Noel) Solutions - February 2010
Christmas Cheer- May 2010
Cupcake - August 2011
Dinosaur Tracks - June 2011
Disney Princesses - Dreams Come True - August 2011
Doodletype - April 2011
Fabulous Finds - November 2010
Forever Young - December 2011
Graphically Speaking - November 2011
Handyman - October 2011
Hannah Montana - August 2011
Happily Ever After- June 2011
Home Accents - February 2011
Home Decor - February 2011
Indie Art - September 2010
Inspired Heart - August 2011
Jasmine - November 2011
Jolly Holidays - August 2011
Joys of the Season - March 2011
Learning Curve - March 2011
Locker Talk - December 2010
Lovely Floral - October 2011
Makin' the Grade - June 2010
Mickey Font Set - June 2011
Mini Monograms - June 2010
My Community - November 2011
My World - August 2011
New Arrival - December 2010
Old West - November 2011
Opposites Attract - June 2011
Ornamental Iron - April 2011
Pagoda - December 2011
Paisley - December 2011
Paper Pups - April 2010
Pink Journey - December 2011
Playtime - August 2011
Pooh Font Set - June 2011
Printing 101 - April 2011
Printing Press - April 2010
Sans Serif Solutions - February 2010
Savory - October 2011
Sentimentals - December 2011
Serenade - January 2011
Sesame St Font - November 2011
Sesame St Friend - August 2011
Simply Sweet - November 2011
Slumber Party - October 2011
Soccer - August 2010
Speaking of Fall - June 2011
Speaking of School - January 2011
Speaking of Winter - January 2011
Splish Splash - October 2011
Stamped - March 2010
Stamping - March 2011
Stone Script - September 2010
Street Sign font - February 2010
Superman - December 2011
Tags, Bags, Boxes and more - March 2010
Tear Drop - October 2010
Tie the Knot - November 2011
Tinkerbell & Friends - June 2011
Walk in my Garden - December 2011
Wedding - February 2011
Word Builders 1 - A Word Party - March 2011
Word Builders 2 - A Garden of Words - January 2011
Word Builders 3 - An Ocean of Words - January 2011
Zooballoo - August 2010