1. Attaching them directly from your computer. For your photos to show in the message they must be less than 1mb (1,024kb) in size. If they are larger than 1mb they will show up as an attachment and anyone wanting to see the photo will have to click on the attachment to open it. For information on resizing your photos see this post: http://myfaqcricutds.blogspot.com/2010/12/resizing-pictures-to-upload-to-message.html
2. Uploading them to a photo sharing site (eg. Photobucket) and inserting the link into your post. Photobucket automatically resizes the photos for you using the settings you set when you're uploading them.
METHOD 1 - UPLOADING FROM YOUR COMPUTER
1. Create a new post on the messageboard and type your message in the message box.
2. Place a tick in the "Attach files to this post" box
3. Click the Post button
4. Click the Browse button and select the file you want to upload from your computer. Press Open and you'll be taken back to the above screen.
5. Click the Upload button.
If you want to select more photos repeat steps 4 & 5.
6. Once you have finished adding photos press the Back button.
Your photo will be added to your thread and will be posted to the board.
From this page you can edit your post (Press the Edit button) or you can attach more photos (press the Attach button).
If you want to delete your photo, press the Attach button then press the Delete option for that photo.
Press the OK button
Press the Back button and you'll be back at your post.
-----------------------------------------------------------------------------
METHOD 2 - UPLOADING FROM PHOTOBUCKET
1. Login to your photobucket account
2. Go to the album that contains your photo
3. Click on the photo you want to share.
4. To the right you will see a box with several links in it. Click inside the box labeled Direct link.
5. The HTML code that's inside the box will be copied to your clipboard.
6. Open your messageboard post (or create a new one.)
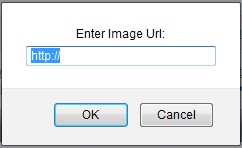
7. Click the Insert Image button from the toolbar.
You will see this dialog box:
7. Paste the code from your clipboard over the highlighted text. (Ctrl V or Edit, Paste)
8. Press OK
9. You can leave the next box blank. (Anything you type in this box will show up when someone hovers over your photo). Press OK
The HTML code of your photo will appear in your post. You can type your post text before or after this code.
10. Press the Post button OR if you want to check what your post will look like (eg to make sure the photo isn't too big) press the Preview button then the Post button when you're ready to post.
If you need to make any changes highlight the code and delete it, then repeat the above process again.










3 comments:
Thanks for this Christina, it will be so useful, I'd wondered how to do it without a Photobucket account. xxsue
Thank you so much!!!!!!!
Without your help I wouldn't never done it!
Your instructions were so easy to follow.
Many thanks!
thank you very much for you help... I have now managed to post 2 pics on one post on the cricut forum...
Post a Comment