Note: These instructions are for those using Windows XP. The instructions for Windows Vista & Windows 7 are towards the end of this tutorial.
1. Hold down the Alt key and press the PrtScn/PrtSc key (usually the top row of keyboard keys towards the right after the F12 key). This copies the contents of your screen to the computers clipboard.Tip: Just pressing the PrtScn key captures the contents of the entire desktop. Using Alt + PrtScn captures only the active window.
2. Open Microsoft Paint (Start, All Programs, Accessories, Paint).
Note: Do yourself a favor and right click on it and select "Pin to Start Menu". From now on you'll only have to select Start and you'll see it in your Start menu.
3. Select Edit, Paste (Ctrl V).

4. Select File, Save (Ctrl S) to save. (Make a note of the where you saved it - i.e. which drive/directory).
5. Give your masterpiece a name in the File Name box and select JPEG from the Save as Type box then click Save. (This creates a much smaller file size than a BMP file does).

To post your picture to the Cricut message board:
6. Start a new Post or select Reply to Post from where you wish to upload your picture.
7. Type your message if necessary
8. Below the message box you will see "Click here to upload!" and a check box with Embed picture in post. Tick the checkbox and click on "Click here to upload!".

9. At the next screen click on the Browse button.

10. Find your file, select it and click Open.

11. Click OK
12. Click OK at the File Uploaded Successfully screen.
13. Click the OK button at the bottom of the Post screen.
Note: You will not see the picture in your post until you go back and view the posted message.
Go take a look!
This is the fastest way but it's not the neatest way. You will probably find that the picture in the post is HUGE. There are a few extra steps you can take to post just the part of the screen you actually want.
14. Follow the above instructions up to number 3 (copying the image into Paint).
15. Click the Select Tool from the Paint Toolbar (2nd button, top row).
16. When you move your mouse over the image, the mouse pointer will turn into a cross hair pointer. Move the pointer to the top left of the part of the image you want to copy. (The section of the DS mat with your design on it).
Note: You may need to scroll down using the scroll bar (to the right of the screen) to see all of your design.
17. Click down with the left mouse button and drag across and down to draw a box around your design.
18. Select Edit, Copy (Ctrl C)
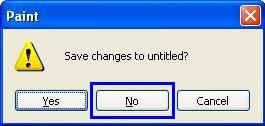
19. Select File, New (Ctrl N). You will be asked if you want to save the changes to your file. Click the NO button.
Note: You CAN save that file if you want - but you probably won't need it again.
20. Select Edit, Paste (Ctrl V). The image you selected will be copied into Paint.
21. The image should be surrounded by Grey.
22. If it is surrounded by WHITE you will need to scroll to the bottom right of the screen (using the scroll bars). Look carefully and you should see a small selection handle in the bottom right of the screen. Move you mouse over this handle until the pointer turns into a double ended pointer. (NOT a four handled pointer). Click down and drag this handle up and to the left until your image is totally surrounded by Grey.
Why? If you don't remove the extra white space the saved image will be too small and will be surrounded by white space. (The uploaded picture will be small but it will take up a lot of screen space on the message board).
23. Now, you can save and upload your image. Go back to step number 4 and continue to step number 13.
***********************************************************
Instructions for Vista and Windows 7
Windows Vista & Windows 7 have a handy tool called the Snipping Tool. You can use the Snipping Tool to capture a screen shot (or snip) of any object on your screen.
You'll find the Snipping Tool in your Accessories. To find it:
- Click the Windows Start button
- Hover your mouse over All Programs
- Click Snipping Tool
Your screen will lighten and you will see this box:
- Click and drag your cursor around the part of the screen you want to capture. As you drag your mouse the part of the screen you are capturing will darken.
- Click the Save button
- Select the directory you want to save to
- Type a name in the File Name box
- Change the File type to .jpg if necessary (jpg/gif/txt are accepted when uploading files to the cricut message board)
- Select Save
Now follow steps 6 - 13 above to upload your file to the message board.
I'm sure you'll agree the snipping tool makes capturing images so much easier!







5 comments:
Thank you so much! I have been asking everyone how to do this. It is much appreciated. You rock! I'll definately be bookmarking this site.
I couldn't figure out why my computer wouldn't do this! I finally found out that it
doesn't work with Windows Vista. If you are a Vista user there is
actually a new feature called 'Snipping Tool'. It is located on the
start menu under accesories and it very easy to use. Just an FYI.
Thanks brandi! I'm still using XP so didn't know that. I'll definately update the instructions after I go research that Snipping Tool info.
This is so very nicely done!! Going to send everyone here!!
Kudos,
Viqui
Cutters Creek
The ALT / Print Screen function does work in Vista... I have used it numerous times. I simply open Photshop or paint shop pro, and do a simple ctrl+V and psp opens a new window, sized to the active windo in which I wanted.
I have not researched "snipping tool" and probally wont... this is quicker, and I use it all the time :)
Thanks for the tutorial tho...
Post a Comment