Please come on over to my new blog and follow me there -
http://thenon-craftycrafter.blogspot.com.au/

I'll be transferring information to there from this blog as I get time. Any new tutorials/info will be posted there!


Monday, 2 June 2008

Designing with multiple cartridges

Things you need to know to cut designs using multiple cartridges:
  • You need to have all the cartridges used in the design
  • If you're not using a Jukebox, you need to have a cartridge in the machine before you press CUT. Press Cancel at the "Cricut Jukebox Check" dialogue box then load each cartridge when prompted.
  • You must NOT turn your Cricut off when swapping cartridges
  • If you're using a Jukebox, make sure all the carts you have used are loaded then press the OK button

The frame below uses the following cartridges: George, Accent Essentials and Base Camp.


First, we’ll create a basic 3” square frame using the square shape from the George cartridge

  • Double click the George cartridge from the Cartridge Library. The George keypad should now be visible.

  • Click the Shift Lock key on the Design Studio keypad and click on the square shape. This will insert a square onto your mat.


(Note: We use the square shape because the rectangle shape causes the program to report an error. See info on “The dreaded red X”).
  • Use the Width property to stretch it to 3”.
  • Using the Horizontal Height handle shrink the height of the box to around .250”


The height of my rectangles ended up as .267”. Any height around that measurement is fine. (You can’t change the height or width of an object to less than 1” using the Properties box. This is why we need to use the Horizontal height handle).

  • While the rectangle is selected, click the Welding box.
  • Change the X axis property to 1.5 and the Y axis property to 1. This will make it easier to place the hearts around the box.

Now, we’ll copy that box to make the rest of the frame.

  • Make sure the shape is selected and Click the Copy button (or select Edit, Copy / CTRL +C). This copies the selected shape to the clipboard.
  • Click the Paste button (or select Edit, Paste / CTRL +V). This places a copy of the shape directly on top of the original shape.
  • Using the down arrow on you keyboard move this shape so that the bottom edge is aligned with the 4” grid line on the mat.

  • Select paste again. Another rectangle will be pasted on top of the first rectangle.
  • Select this rectangle and click the Turn 90 button.

  • Change the X axis to 1.5 and the Y axis to 4.0. This will move the shape to form the left edge of the frame.
  • While this rectangle is selected click the Copy button to copy it to the clipboard.
  • Click the Paste button
  • Select the new rectangle and move it over to 4.25” using the X axis property box.
You now have your completed frame. Because we clicked the Welding box after we created our first rectangle, the other three rectangles should also have Welding ticked as part of the copying process.

Now we’ll add the hearts to the outside edges.
  • Still using the George cartridge, make sure the Default size is set to 1”
  • Click the Heart key.


A heart will be placed on your mat.


  • Select that heart and click Welding
  • While the heart is still selected change the Rotate figure to -45

Now the heart should look like this:


  • Using the Free Move handle, move the heart over the top left hand corner of the frame, until the top point of the heart is touching the corner of the frame.
  • While the heart is still selected, click the Copy button.
  • Click the Paste button.
A new Welded heart will be pasted on top of the first heart.
  • While it is selected change the Rotate box to 45
Here's what you should see:


  • Using your keyboards right arrow key, move the heart over to the right. When you get close to where it should be hold down the Ctrl key and as you move the heart it will move in smaller increments allowing you to better place the object. (If you have placed your objects on the mat in the same place I have, the X axis will be 4.2)

  • Click the Paste button again. Another heart will be placed on top of the first heart.
  • Change the Rotate amount to -135.

  • Using the down arrow, move the new heart down to the bottom left hand corner of the frame.

  • Click the Copy button
  • Click the Paste button
  • Change the Rotate figure on the new heart to 135
  • Using the right arrow key, move the heart over to the bottom right corner of the frame.
Now all four corners will have a welded heart.

  • Click the heart key again and insert another heart onto the mat.
  • Move that heart to the top of the frame, so that the top of the heart is aligned with the highest point of the two corner hearts and the middle of the heart is aligned with the vertical grid line.
  • Click Welding.
  • Copy and paste that heart.
  • Click the Turn 90 button
  • Select the heart and move it to the left side of the frame.
To make it easier to line the hearts up correctly I moved the new heart over the top of the corner heart until one half of the new heart covered half of the bottom heart - like this:


  • Continue to move it down until it is centred along the left edge of the frame.


Don’t forget you can use the ALT key to make the handles disappear while you are moving the object and use the CTRL key to move the object in smaller increments.

  • Click Paste. Another heart will be placed on the mat.
  • Click the Turn 90 button until the heart is upside down.
  • Move the heart to the bottom edge of the frame. (Use the tip above to help align the hearts)

  • Paste the final heart onto the mat.
  • Click the Turn 90 button until it faces the right edge of the frame
  • Move it across and down until it aligned with the top right heart, then move it down until it is centred.
Now all the hearts have been positioned.


Now we’ll insert the text into the frame.
  • Select the Base Camp cartridge from the Cartridge library.
  • Press the Shift Lock key then the "I" key

  • Move the “I” inside the frame so it is just overlapping the bottom of the top, middle heart.

  • Click Welding
  • Use the Scale Stretch Handle to make the “I” a little smaller. (Don’t worry too much about the size yet as we will adjust it more after we have inserted the Heart and the “U”)
  • Insert a “U” on to the page and move it so that the bottom just overlaps the tip of the bottom middle heart.

  • Again, adjust the size
  • Click Welding
  • Select the Accent Essentials cartridge.
  • Click the Heart shape to place a heart on your mat

  • Place the heart between the “I” and the “U”.
  • Adjust the size if necessary and use the Rotate handle to turn it slightly. Make sure that part of the heart slightly overlaps both the “I” and the “U”.
  • When you are satisfied with its size and placement click Welding.
That’s the design completed.

It’s always a good idea to preview the design to make sure everything has welded. The best way to preview your design is from a new page.

Click the New Page button

Click the Preview button

You’ll might see something like this:


Some parts of the design aren’t showing and the inside of the frame is missing. This means we need to “burp” the frame. To do this:
  • Click back on the tab of the page that has the design on it
  • Select the right hand side of the frame
  • Select Edit, Cut (or Ctrl X or use the Delete button)

  • Undelete the shape by pressing Edit, Undo (or Ctrl Z)
  • Click on the tab for the Preview page again.
Now when you preview your design should look like this:


If the design still doesn’t look right in preview, continue to delete then undelete different parts of the frame until the burping is successful.

If there are any parts of the design that are coloured as opposed to showing the outline, it means they haven’t had the Welding box ticked. Select the shape and tick Welding.

Good luck!
Wednesday, 19 March 2008

Milk carton file

Here's my first .cut file to share. It's pretty basic and I still have some tweaking to do.

I'll update the link when I have finished.


It was created using the George cartridge and fits on a 12x12 mat.

The link to the file: http://www.mediafire.com/?oi02dl9iulx

Tuesday, 5 February 2008

Previewing your design without the non-cutting parts showing

The preview button in CDS is a great feature, but sometimes all the non-cutting parts of the design can be a distraction.

Here’s an example:

This is not a particularly “busy” design, but the non-cutting lines and the boxes around each object, together with the crosses in the middle of each object still make checking your design for errors a little difficult.

To preview your design without all these distractions:

Click the New Page button
Make sure you are viewing the new page and click the Preview button

Now you will see your design without any of the non-cutting parts showing, like below:

This also makes it easier to see that some objects may need to be moved or adjusted in size. For example, it’s now easier to see that the left hand side of the frame above is a little too long.

If you find later that you don't want this page as part of your saved design, just select View, Delete Page (or press Ctrl D). Make sure you are on the correct page of your design when you are performing this step as you can't un-delete a page!

More on welding inside a frame - "Burping" your design

Sometimes when you weld an object/word inside a frame and click Preview, the inside of the frame won’t have welded correctly.

Here is an example:

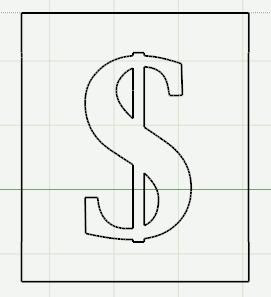
The dollar sign has been welded into a frame made using the Base Camp cartridge. Here’s how it looks before you click Preview:


And here is how it looks after you click Preview:


Notice how the inside of the frame doesn’t appear.

Shari (sboz) from the Cricut.com message board has come up with a great term called “Burping” that describes what you need to do. Essentially what has happened is that “air” has become “trapped” inside the frame. If you expel that air your frame will cut correctly.

“Burping” is easy. Just select the last part of the frame you created (in the example above it was the right hand vertical side of the frame).

  • Select Edit, Delete Shapes (or press the Delete key on your keyboard)
  • Select Edit, Undo Delete Shapes (or Ctrl Z on your keyboard)

Now when you click Preview, this is what you should see:

If your frame still isn’t showing correctly, follow the above procedure again deleting different parts of the frame until you get the correct result.

Friday, 4 January 2008

Taking a screen shot of your DS screen and uploading it to the Cricut message board

Not strictly a Design Studio tutorial, but handy to have nonetheless when you want to upload screen shots of your work.

Note: These instructions are for those using Windows XP. The instructions for Windows Vista & Windows 7 are towards the end of this tutorial.

1. Hold down the Alt key and press the PrtScn/PrtSc key (usually the top row of keyboard keys towards the right after the F12 key). This copies the contents of your screen to the computers clipboard.

Tip: Just pressing the PrtScn key captures the contents of the entire desktop. Using Alt + PrtScn captures only the active window.

2. Open Microsoft Paint (Start, All Programs, Accessories, Paint).

Note: Do yourself a favor and right click on it and select "Pin to Start Menu". From now on you'll only have to select Start and you'll see it in your Start menu.

3. Select Edit, Paste
(Ctrl V).


4. Select File, Save (Ctrl S) to save. (Make a note of the where you saved it - i.e. which drive/directory).

5. Give your masterpiece a name in the File Name box and select JPEG from the Save as Type box then click Save. (This creates a much smaller file size than a BMP file does).


To post your picture to the Cricut message board:

6. Start a new Post or select Reply to Post from where you wish to upload your picture.


7. Type your message if necessary


8. Below the message box you will see "Click here to upload!" and a check box with Embed picture in post. Tick the checkbox and click on "Click here to upload!".


9. At the next screen click on the Browse button.


10. Find your file, select it and click Open.


11. Click OK

12. Click OK at the File Uploaded Successfully screen.


13. Click the OK button at the bottom of the Post screen.

Note: You will not see the picture in your post until you go back and view the posted message.

Go take a look!

This is the fastest way but it's not the neatest way. You will probably find that the picture in the post is HUGE. There are a few extra steps you can take to post just the part of the screen you actually want.

14. Follow the above instructions up to number 3 (copying the image into Paint).


15. Click the Select Tool from the Paint Toolbar (2nd button, top row).


16. When you move your mouse over the image, the mouse pointer will turn into a cross hair pointer. Move the pointer to the top left of the part of the image you want to copy. (The section of the DS mat with your design on it).

Note: You may need to scroll down using the scroll bar (to the right of the screen) to see all of your design.

17. Click down with the left mouse button and drag across and down to draw a box around your design.


18. Select Edit, Copy (Ctrl C)

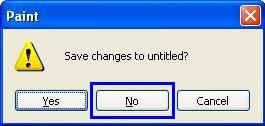
19. Select File, New (Ctrl N). You will be asked if you want to save the changes to your file. Click the NO button.


Note: You CAN save that file if you want - but you probably won't need it again.


20. Select Edit, Paste (Ctrl V). The image you selected will be copied into Paint.

21. The image should be surrounded by Grey.

22. If it is surrounded by WHITE you will need to scroll to the bottom right of the screen (using the scroll bars). Look carefully and you should see a small selection handle in the bottom right of the screen. Move you mouse over this handle until the pointer turns into a double ended pointer. (NOT a four handled pointer). Click down and drag this handle up and to the left until your image is totally surrounded by Grey.

Why? If you don't remove the extra white space the saved image will be too small and will be surrounded by white space. (The uploaded picture will be small but it will take up a lot of screen space on the message board).

23. Now, you can save and upload your image. Go back to step number 4 and continue to step number 13.


***********************************************************

Instructions for Vista and Windows 7

Windows Vista & Windows 7 have a handy tool called the Snipping Tool.
You can use the Snipping Tool to capture a screen shot (or snip) of any object on your screen.

You'll find the Snipping Tool in your Accessories. To find it:
  • Click the Windows Start button

  •  Hover your mouse over All Programs

  • When the Program list has expanded click Accessories


  • Click Snipping Tool


Your screen will lighten and you will see this box:


  • Click and drag your cursor around the part of the screen you want to capture. As you drag your mouse the part of the screen you are capturing will darken.


  • Click the Save button 
  • Select the directory you want to save to
  • Type a name in the File Name box
  • Change the File type to .jpg if necessary (jpg/gif/txt are accepted when uploading files to the cricut message board)
  • Select Save
Now follow steps 6 - 13 above to upload your file to the message board.

I'm sure you'll agree the snipping tool makes capturing images so much easier!


Tuesday, 1 January 2008

Wish list of future features

While I definitely love the Design Studio software, there are things about it that could be improved. Here's my list of what I would like to see changed/added. Let me know if you have any to add to the list.
  1. Speed up the loading time. Depending on the computer it takes anywhere between 30 seconds to over a minute to load. Do the fonts and keywords have to be loaded EVERYTIME?

  2. The option of minimizing/sending to the back the opening Cricut image. It blocks a large portion of the screen while it is loading. Yes you can move it over to the side, but it's still in the way if you want to do anything else while your waiting for DS to load. (See item 1).

  3. I would like the ability to turn on and off the gridlines in the mat. Sometimes they get in the way when you are checking to see if your welding has worked.

  4. For the same reason I would like to be able to turn off the box around the shape.

  5. This one is HUGE! I can't believe I forgot about it had to go back and add it now. Please give us the ability to weld inside a frame. At the moment if we weld something inside a frame, the inner part of the frame and some parts of the object that has been welded inside don't cut. Being the very clever people that we are, we have come up with a way to do it using 4 welded rectangles, but what happens if we want to use a different shaped frame eg. a circle/oval/heart...?

  6. Group/ungroup option. This is a biggy. Being able to group a range of objects to manipulate them would be fantastic to have.

  7. Select All/Select multiple. Another biggy! We should be able to select everything/multiple items on the mat and move them around. This would be very handy when welding multiple objects.

  8. While we're on the subject of selecting - make it easier to select an object. Clicking inside the object to select it would be great.

  9. Nudge buttons - It would be great to be able to click and hold the nudge button rather than having to click it repeatedly.

  10. Shadows - Wouldn't it be fantastic if there was an auto welded shadow function. Create a design, weld it, then click shadow. Oh joy!

  11. I'd like to see a mirror image option and a flip vertical option.

  12. There definitely should be an Auto Save option. Computers are unpredictable and love to freeze and the most inconvenient time. Having a point that you can go back to rather than recreating your whole project if you have forgotten to save would be great. Even this Blogger software has Auto Save and it's FREE!

  13. I'd like to be able to use the Shift/Caps Lock keys on my keyboard instead of having to click it on and off with my mouse. Not a big thing, but annoying just the same.

  14. Make it easier to move that pesky cursor. The double click speed seems to have something to do with it, but really - we should be able to just click somewhere on the mat to move the cursor to that position.

  15. Crop function. We need the ability to crop out parts of objects that we don't want to cut. Eg. if you just wanted the grapes from the Paper Dolls Dress up cartridge you could crop out the other fruits.

  16. I'd like another keyboard shortcut. Delete All. There is a delete all option in the menu, but I'd like a keyboard combo that I could do the same - say Shift Del or something.

    The following are ideas/suggestions from members of the Cricut.com Design Studio Message board. Others may have suggested these ideas in posts that I haven't read (of forgotten) so if I've missed your name, my apologies. :)

  17. The ability to nudge up & down would be great. Idea from Mandy

  18. An erase option. Similar to a Crop feature, but could be used to erase smaller parts of designs (like the tails on the letters in Opposite Attract). Idea from Sarah (mommyto3bugs)

  19. Make the measurements on the CDS mat easier to see. Idea from Kissakoala and Glenda

  20. A percentage scaling option including Maintain Aspect Ratio that can be switched on/off. In other words, the ability to increase or decrease the size of a design (either individual pieces or with Select All, then "shrink" or "grow" it in one or both directions. Idea from JT

  21. The numbering on the virtual mat and the "real" mat are different. The top and left edges are the same, but the numbering on the bottom and right hand side of the virtual mat are reversed. I'd like to see them match up. Idea from JT

  22. The ability to change the speed of the cut. CDS seems to have taken over control of the cutting speed and sometimes it's too slow and is tearing the paper. Idea from Tammy

  23. The ability to see which cartridges have been used in a design without having to click on each shape. Eg. a menu item somewhere called "current design". Idea from Karen


    Do you have any you would like to add to the list ?

Keyboard shortcuts

Every application has them. Here is a list of keyboard shortcuts for Design Studio.


Ctrl C - Copy

Ctrl V - Paste

Ctrl Z - Undo

Ctrl Y - Redo

Ctrl S - Save

Ctrl D - Delete Page

Ctrl A - Preview

Ctrl L - Clear Preview


Other things you can do with the keyboard:

Del - Delete Shapes

Use the up, down, left & right keys to move your selected shape/letter around on the mat.

Hold down the Ctrl key while you are using the up, down, left & right keys to move your shape in small increments.

Hold down the Ctrl key when you are resizing welded objects that you have grouped using the Select All feature. They will not only all be resized proportionally but they will stay welded.

Hold down the Alt key while you are moving your shapes around and the eight selection handles will disappear. This helps make placement of objects more precise. When you release the Alt key the selection handles reappear.

Pressing the space bar will move the cursor to the right 1 inch at a time.


Welded Shadows

Here is a pictorial demonstration on creating welded shadows!

Be aware - this only works on cartridges that have a shadow feature.

Cartridge used:
George/Basic Shapes


1. Right click anywhere on the mat. You will see this box:2. Highlight the text “untitled page” and overtype it with a new name eg: Top layer

3. Press enter


4. Create your first layer. For this exercise I will be using the word “Welcome”.
Type this in starting on the left hand side of the mat and using a size of 1.5/8"

5. With Kerning set to 0.000 click the Apply button


6. Using the Nudge buttons, make sure all the letters are overlapping.


7. Click the Preview button. This is what you should see so far. (Yours may
be a different color). 8. With your word selected, click Weld. This should be your result.

9. Now would be a good time to SAVE!

10. Click the New Page button. Rename this page to: Shadow

11. Click the Shadow key on the DS keyboard


12. Click the Preview button


13. Open the View menu, and make sure “Keep preview as mat background” is
ticked. If not, click on it to put a tick near it.

14. Move the cursor to the left of the mat and below the word “Welcome”.


15. Type the shadowed word “Welcome”


16. Select your shadowed word and move it up so the W covers the W of the
unshadowed word.

17. Click Preview. The Shadowed “Welcome” will show up as a different color.

18. Click on the Shadowed E and nudge it to the left until it sits over the
unshadowed E.


19. Repeat this process with the remaining letters.

20. Click Preview in between nudging each letter so that you can better see where the letters need to go. Lighter preview colors are easier to see. To change the Preview color, right click on the mat, Select Set Preview Color and click on any light color from the palette. Here is the finished result.


21. Making sure that you are still on the Shadow mat, select the word Welcome and click Weld.

You may need to fiddle with the nudging slightly but this should be the result.


22. To cut your design you can either cut one layer at a time or you can copy the shadowed word to the top layer, (or vice versa) and move it to the bottom of the mat. (Turn off Keep preview as background). Then on your real mat you can position your 2 different papers and cut both titles at the same time.