- You need to have all the cartridges used in the design
- If you're not using a Jukebox, you need to have a cartridge in the machine before you press CUT. Press Cancel at the "Cricut Jukebox Check" dialogue box then load each cartridge when prompted.
- You must NOT turn your Cricut off when swapping cartridges
- If you're using a Jukebox, make sure all the carts you have used are loaded then press the OK button
The frame below uses the following cartridges: George, Accent Essentials and Base Camp.

First, we’ll create a basic 3” square frame using the square shape from the George cartridge
- Double click the George cartridge from the Cartridge Library. The George keypad should now be visible.
- Click the Shift Lock key on the Design Studio keypad and click on the square shape. This will insert a square onto your mat.
(Note: We use the square shape because the rectangle shape causes the program to report an error. See info on “The dreaded red X”).
- Use the Width property to stretch it to 3”.
- Using the Horizontal Height handle shrink the height of the box to around .250”
The height of my rectangles ended up as .267”. Any height around that measurement is fine. (You can’t change the height or width of an object to less than 1” using the Properties box. This is why we need to use the Horizontal height handle).
- Change the X axis property to 1.5 and the Y axis property to 1. This will make it easier to place the hearts around the box.
Now, we’ll copy that box to make the rest of the frame.
- Make sure the shape is selected and Click the Copy button
(or select Edit, Copy / CTRL +C). This copies the selected shape to the clipboard.
- Click the Paste button
(or select Edit, Paste / CTRL +V). This places a copy of the shape directly on top of the original shape.
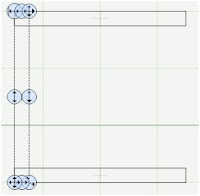
- Using the down arrow on you keyboard move this shape so that the bottom edge is aligned with the 4” grid line on the mat.
- Select paste again. Another rectangle will be pasted on top of the first rectangle.
- Change the X axis to 1.5 and the Y axis to 4.0. This will move the shape to form the left edge of the frame.
- While this rectangle is selected click the Copy button to copy it to the clipboard.
- Click the Paste button
- Select the new rectangle and move it over to 4.25” using the X axis property box.
Now we’ll add the hearts to the outside edges.
- Still using the George cartridge, make sure the Default size is set to 1”
- Click the Heart key.
A heart will be placed on your mat.
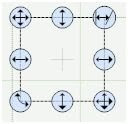
- While the heart is still selected change the Rotate figure to -45
Now the heart should look like this:
- Using the Free Move handle, move the heart over the top left hand corner of the frame, until the top point of the heart is touching the corner of the frame.
- While the heart is still selected, click the Copy button.
- Click the Paste button.
- While it is selected change the Rotate box to 45
- Using your keyboards right arrow key, move the heart over to the right. When you get close to where it should be hold down the Ctrl key and as you move the heart it will move in smaller increments allowing you to better place the object. (If you have placed your objects on the mat in the same place I have, the X axis will be 4.2)
- Click the Paste button again. Another heart will be placed on top of the first heart.
- Change the Rotate amount to -135.
- Using the down arrow, move the new heart down to the bottom left hand corner of the frame.
- Using the right arrow key, move the heart over to the bottom right corner of the frame.
- Click the heart key again and insert another heart onto the mat.
- Move that heart to the top of the frame, so that the top of the heart is aligned with the highest point of the two corner hearts and the middle of the heart is aligned with the vertical grid line.
- Click Welding.
- Copy and paste that heart.
- Click the Turn 90 button
- Select the heart and move it to the left side of the frame.
- Continue to move it down until it is centred along the left edge of the frame.
Don’t forget you can use the ALT key to make the handles disappear while you are moving the object and use the CTRL key to move the object in smaller increments.
- Click Paste. Another heart will be placed on the mat.
- Click the Turn 90 button until the heart is upside down.
- Move the heart to the bottom edge of the frame. (Use the tip above to help align the hearts)
- Paste the final heart onto the mat.
- Click the Turn 90 button until it faces the right edge of the frame
- Move it across and down until it aligned with the top right heart, then move it down until it is centred.
Now we’ll insert the text into the frame.
- Select the Base Camp cartridge from the Cartridge library.
- Press the Shift Lock key then the "I" key
- Move the “I” inside the frame so it is just overlapping the bottom of the top, middle heart.
- Click Welding
- Use the Scale Stretch Handle to make the “I” a little smaller. (Don’t worry too much about the size yet as we will adjust it more after we have inserted the Heart and the “U”)
- Insert a “U” on to the page and move it so that the bottom just overlaps the tip of the bottom middle heart.
- Again, adjust the size
- Click Welding
- Select the Accent Essentials cartridge.
- Click the Heart shape to place a heart on your mat
- Place the heart between the “I” and the “U”.
- Adjust the size if necessary and use the Rotate handle to turn it slightly. Make sure that part of the heart slightly overlaps both the “I” and the “U”.
- When you are satisfied with its size and placement click Welding.
It’s always a good idea to preview the design to make sure everything has welded. The best way to preview your design is from a new page. Click the New Page button

Click the Preview button

You’ll might see something like this:
Some parts of the design aren’t showing and the inside of the frame is missing. This means we need to “burp” the frame. To do this:
- Click back on the tab of the page that has the design on it
- Select the right hand side of the frame
- Select Edit, Cut (or Ctrl X or use the Delete button)
- Undelete the shape by pressing Edit, Undo (or Ctrl Z)
- Click on the tab for the Preview page again.
If the design still doesn’t look right in preview, continue to delete then undelete different parts of the frame until the burping is successful.
If there are any parts of the design that are coloured as opposed to showing the outline, it means they haven’t had the Welding box ticked. Select the shape and tick Welding.
Good luck!







18 comments:
i bet you can't wait for the jukebox to come!! I am in the UK and bought my little bug 8 weeks ago, I have already upgraded to the expression and am just awaiting delivery, i have sold my little bug to a (very excited)friend. I am so happy to have found your excellent site and have passed it on to my firend a also. I have only barely scratched the surface of my cds and the opportunities it is affording me is incredible!
Amanda
Another great lesson. Thanks for the step by step (with photos). I'm going to have to try this.
OZ I see you are still giving away our designing secrets! LOL Great job with showing how to use multiple carts! Girl you are fantastic and explaining things!! I direct people to your blog and Susan's blog all the time!
Thanks, this really helped. I just got my cricut expression for mother's day and this past week got Design Studio and wasn't getting things to work, but now thanks to you I have a better feel of things. Thanks again
I've had my cricut and ds for a while now, but haven't had much time to play around with it. I want to make a Swivel or Swing card for my mom to give out as christmas presents to her 37 grandchildren, and don't really want to cut with an exacto knife. So I thought it would be easy to do with ds - but once you sit down and start - I find I need a few more tutorials!!!! Thanks for yours! It's great for all of us who don't know much!!! Rosy
Thank you so very much for the wonderful instructions you always provide!!
OK! In a nutshell.... I am only 2 months old on my baby bug. DS is only up since the update... I tried too follow your directions and well I lost it somewhere. I use my cricut for my 5 children as well as foster teens. They can express feelings. I try and stay a step a head of them. I was lost on here :( I was also told that I could d/l files off of blogs but I do not know how?
I have about 30 carts as $29.99 is more affordable then reg price. I have a juke box that I played with yesterday and could not get it too work. I also found that I am getting my E for the holidays. OOPs! I found it in the kids bedroom!
If anyone is able too help me out here! Please email me @ formy5children@yahoo.com I am so greatful for everyone posting but I still feel like I am lost in Cricut land!
Happy Holidays!
Marla
Thanks for the wonderful tips, this is helping so much! I was wondering if there is a way to select the whole image (especially if it is pieced together with multiple shapes) to resize, move or copy it?
Brilliant article - thanks! I have only installed my Design Studio today and have been enjoying playing. I, too, would love to know - is there a way of selecting multiple shapes so you can move, resize or otherwise fiddle around with them all at the same time?
Becki
xx
Hi MMaher & Becki
Unfortunately at this stage there is no Select All feature in DS. It's something we have been begging for since DS first came out.
Why can't one of you smart bloggers that create and play with these files live next door to me!!!!???? Just added to my list---things to look for in a neihgborhood when moving! This stuff sooo confuses me, I almost need a video seeing it in action. jb
I am very new to this whole Cricut phenomenon and while I have loved my Expression machine and all the cartridges I have collected, I have not "loved" the DS software because I could not figure it out. I was ready to give it away and call it a waste of money. Thanks to having found your website I may be able to work with it now.
Thank you soooooo much for your tips and for all the graphics you use in your directions. Please continue to post directions for the craft challenged ones of us. You are a life-saver.
great video...just one question, and that is when you are cutting the welded product of more that one cartridge, what is the process?
It will cut the shapes (I am doing multiples of the same shape) using the first cartridge. Do you wait til it is finished, then insert the second cartridge and press cut? just worried if it will line up again properly that way. Thanks!!
After you click Cut, DS will prompt you to insert each cart you have used in the design. (Select Cancel at the first msg box if you're not using a jukebox). Once the Cricut has read each cart it will only then start to cut.
I recently received the Design Studio as a gift and I was thrilled. It is a little daunting but your site is a great help. I also received two new cartridges, "From My Kitchen & Designers Calendar". They are not showing up in the library. Is there something that I need to do to add them. I already ran an update and that didn't do it. Thanks for any help you can give.
Thank you so much for sharing your secrets to using the cricut DS. i have had the program for awhile but never knew how much it can do. I could play with it for hours. thanks again,
Susan Glass
Even though it was an older post, I appreciate that it is still there for me to find!!
Post a Comment