You'll find all the latest version numbers over on my new blog.....
http://thenon-craftycrafter.blogspot.com.au/2013/06/cricut-latest-versions-numbers-machines.html
For updates feel free to follow/subscribe over there! :)
Showing posts with label Gypsy. Show all posts
Showing posts with label Gypsy. Show all posts
Friday, 15 February 2013


Saturday, 10 March 2012
Comparison chart CCR vs DS vs Gypsy
This post has been moved to my new blog - here:
Please come follow me there! ♥

Friday, 25 February 2011
Looking for Gypsy videos?
If you're looking for videos on how to use your Gypsy, don't forget to visit Provocraft's YouTube channel: http://www.youtube.com/provocraft
Friday, 17 December 2010
Updating your Gypsy
My first Gypsy post! Now that I have my very own mini DS I thought it was time!
Today I updated my Gypsy to add the carts that were released in Hello Thursday and it worked!!!
Here's the step by step instructions:
Plug your Gypsy into a power outlet. (Downloading the updates takes a while and you don't want your battery to die half way through!)
Connect your Gypsy to your computer using the USB cord
Disable or turn off your virus software and firewall. (I use Trend Micro and I have to exit out of it completely as just disabling it doesn't work - it still blocks access to the Gypsy)
Power on your Gypsy. Wait for it to finish loading. Once the Welcome screen appears...
Open Cricut Sync from your computer. (If you haven't downloaded Cricut Sync yet you can get it here: http://www.cricut.com/imagine/support.aspx

You'll see this on your Gypsy:

You'll see this dialog box on your computer:
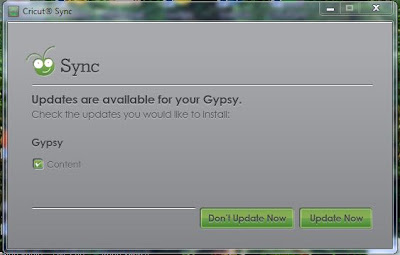
Press the Update Now button
You'll see this box:

Depending on the size of the update (and the speed of your computer/ADSL, AND how many others are downloading at the same time...) this could take a while...
For me this part of the update took approx 1 hour and 5 minutes.
Once it's finished downloading you'll see this box:

After about 5 minutes you'll see this box:

After another 5 minutes you'll see this box:

Then this box:

Finally, this box:

Exit out of Cricut Sync by clicking on the X in the top right corner.
If the Gypsy continues to stay connected:
Open up Gypsy Sync again. You should see this message:

Press the OK button
Exit out of Gypsy sync again and you should go back to the main Gypsy screen.
The total time for me was approx 1 hour 25 minutes and went without a hitch!
Today I updated my Gypsy to add the carts that were released in Hello Thursday and it worked!!!
Here's the step by step instructions:
Plug your Gypsy into a power outlet. (Downloading the updates takes a while and you don't want your battery to die half way through!)
Connect your Gypsy to your computer using the USB cord
Disable or turn off your virus software and firewall. (I use Trend Micro and I have to exit out of it completely as just disabling it doesn't work - it still blocks access to the Gypsy)
Power on your Gypsy. Wait for it to finish loading. Once the Welcome screen appears...
Open Cricut Sync from your computer. (If you haven't downloaded Cricut Sync yet you can get it here: http://www.cricut.com/imagine/support.aspx
You'll see this on your Gypsy:

You'll see this dialog box on your computer:

Press the Update Now button
You'll see this box:

Depending on the size of the update (and the speed of your computer/ADSL, AND how many others are downloading at the same time...) this could take a while...
For me this part of the update took approx 1 hour and 5 minutes.
Once it's finished downloading you'll see this box:

After about 5 minutes you'll see this box:

After another 5 minutes you'll see this box:

Then this box:

Finally, this box:

Exit out of Cricut Sync by clicking on the X in the top right corner.
If the Gypsy continues to stay connected:
Open up Gypsy Sync again. You should see this message:

Press the OK button
Exit out of Gypsy sync again and you should go back to the main Gypsy screen.
The total time for me was approx 1 hour 25 minutes and went without a hitch!
Tuesday, 20 July 2010
Tea bag holder to share
Here's another file I did this week.
Jennifer from the cricut message board was looking for a DS/gypsy cut file for this:
http://mytimemadeeasy.com/store/index.php?main_page=product_info&products_id=144
Here's what I came up with. I think it's pretty close...


Click on the links below to download the files.
Tea bag holder cut file for Design Studio
Tea bag holder .gypsy file
Jennifer from the cricut message board was looking for a DS/gypsy cut file for this:
http://mytimemadeeasy.com/store/index.php?main_page=product_info&products_id=144
Here's what I came up with. I think it's pretty close...


Click on the links below to download the files.
Tea bag holder cut file for Design Studio
Tea bag holder .gypsy file
Saturday, 17 July 2010
Pennant Garland cut file
I haven't shared a cut file for ages! So I thought it was time I did something about it...
Celeste from the Cricut.com message board was looking for a DS cut file for the pennant garland she found at this blog: http://www.oncewed.com
It's a great design. Thanks Anna from Once Wed for sharing the directions and template!

I love a challenge (and I was avoiding the ironing....) so I jumped right in.
Here's what I came up with. It uses George & Basic Shapes and fits on the 12x12 mat.
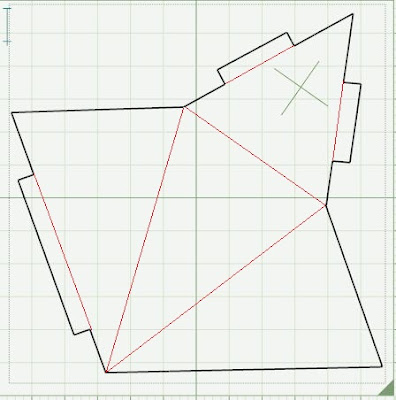
I've added the red lines to indicate where to fold.
Here's the DS file: Pennant DS file
Here's the Gypsy file: Pennant Gypsy file
Enjoy! I'd love to see pics if you use the file.

Celeste from the Cricut.com message board was looking for a DS cut file for the pennant garland she found at this blog: http://www.oncewed.com
It's a great design. Thanks Anna from Once Wed for sharing the directions and template!

I love a challenge (and I was avoiding the ironing....) so I jumped right in.
Here's what I came up with. It uses George & Basic Shapes and fits on the 12x12 mat.

I've added the red lines to indicate where to fold.
Here's the DS file: Pennant DS file
Here's the Gypsy file: Pennant Gypsy file
Enjoy! I'd love to see pics if you use the file.

Subscribe to:
Posts (Atom)